
K7PEH Installing The Hex Beam
(Last Update: September 19, 2004)
| |
K7PEH Installing The Hex Beam(Last Update: September 19, 2004) |
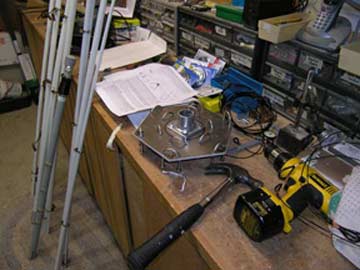
| The Arrival My Hex Beam arrived in two boxes and shown unpacked here. One box contained the white spreader fiberglass rods and the other box was the base plate and the hardware plus the element wires and stretcher lines. |
 |
| Putting It Together (Part 1) The only place to put this together is in the back yard. The hex beam is about 19 feet in diameter so some room is needed. The first step is putting the fiberglass rods together and then taping them tight as recommended (this allows the hex beam to be more easily taken down if needed). The second step is to mount each of the rods onto the U-bolts of the base plate which this picture shows. The next picture is the same view but shown from an elevation. You can see why it is called a Hex Beam. |
 |
 |
| Putting It Together (Part 2) The antenna is ready to be lifted onto the mast. We're done putting it together. This went very fast. I did need a third hand from my wife a few times because the higher bands (12, 10) element wires were quite a stretch to get fastened. So, as I pulled them together, my wife tightened the set screw. Total time from the previous set of pictures to this set is about one hour. The work is basically stringing all of the wires for the driven element and the reflector element for each of the bands. The next photo below is the same but from elevation. |
 |
|
 |
| Lifting the Hex Beam Up To The Roof
(Part 1) So, how do you lift this 19-foot diameter Hex Beam antenna onto the roof of your house. Well, it is very light and very well balanced. This picture here is my son-in-law Brian holding the Hex Beam over his head. Our plan is to first lift the antenna onto the back deck and then lift it onto the roof of the house. |
 |
| Lifting the Hex Beam Up To The Roof
(Part 2) Here we start the lift. Brian is holding the antenna in one hand and climbing the ladder guided by his other hand. I am on the deck merely guiding the antenna to keep it from banging against anything (especially the Japanese Maple you see right behind me). |
 |
| Lifting the Hex Beam Up To The Roof
(Part 3) Well, that was easy. Now, I am holding the antenna on the back deck while Brian walks from the yard to the deck and then up on the roof. This is easier than I thought it would be. |
 |
| Lifting the Hex Beam Up To The Roof
(Part 4) To get the antenna on the roof, Brian just reached down where I was holding the antenna and he grabbed it and moved it into place as you see here. Now, I am walking over to the ladder to climb on to the roof so we can raise the antenna on the mast. |
 |
| Attaching the Hex Beam to the Mast This was the hardest part of the job, attaching the Hex Beam to the rotor which is on a 10 foot mast. The hard part was both Brian and I holding things while I also tightened the screws on the mast clamps. Once on the mast though, we just lifted the mast up and Brian held it while I set all of the guy lines into place. It is guyed at the 10 foot and the 6 foot levels on four sides using heavy Dacron line. Very sturdy. I think I could shimmy up that shaft if I need too. |
 |
| Done So, this 10 foot mast is sitting on the crown of our house 24 feet above ground. The base of the Hex Beam is 2 feet above the rotor which is on the top of the 10 foot mast. This puts the base of the Hex Beam about 36 feet above ground right where Mike Traffie says it should go. Performance is very good. I highly recommend this antenna if you cannot afford the rotation space of a full size beam. I am actually surprised. I would not have bet that it would perform so well right away. No tuning. SWR is flat 1:1 across the entire 20 meter band. My largest SWR is about 1.4:1 on the 10 meter band. I operate this antenna without a tuner. |
 |
Copyright © 2004 Phillip E. Hystad. Contact Webmaster via K7PEH e-mail on QRZ.com page.